How to Grow Ginger at Home
Learn how to plant, grow and enjoy ginger in your home garden and kitchen.

You can grow your own ginger at home using ginger you find at the grocery store.
While ginger is a staple of most American spice cabinets, it is less often found in our gardens. Ginger (Zingiber officinale) is a tropical plant — native to equatorial areas of Asia — and a mainstay in the gardens and kitchens of its homelands. Ginger produces bountiful harvests of tasty rhizomes and leaves that are a culinary delight and a medicinal powerhouse. A tender, herbaceous perennial, ginger is hardy to Zones 9-11. There are a few tricks to growing ginger successfully in temperate climates, but with basic knowledge of its needs, gardeners across the US can succeed with growing ginger at home. Dive in to learn how to grow, harvest and enjoy ginger successfully beyond the tropics — whether in the garden, in containers or indoors.
In This Article
Ginger 101
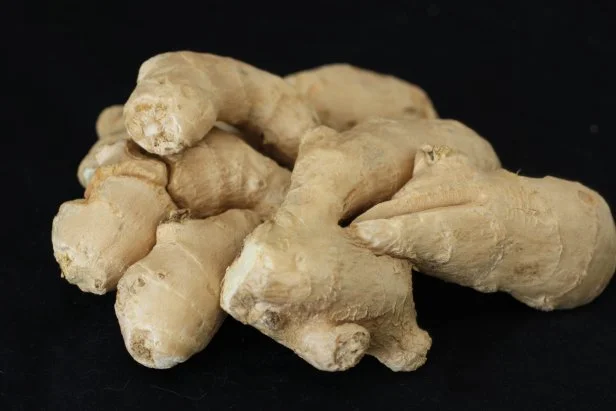
Ginger grows via rhizome — what most people call a root but is actually a modified stem that grows underground. Fresh ginger found in the produce aisle is mature, thick-skinned rhizome. The dried ginger from the spice section is dehydrated, ground rhizome. Fresh ginger can now be found in most grocery stores; it is especially abundant and affordable at Asian markets. In addition to the rhizome, ginger leaves can be used to flavor soups, braises and teas. Ginger is good for an abundance of culinary and medicinal applications, as well as bringing striking texture to the garden.
Each plant produces vibrant green, lanceolate foliage up to 3-4 feet tall, and abundant rhizomes spreading 1-2 feet wide. While ginger’s curved, waxy flowers are coveted tropical imports in the floral trade, ginger is not likely to flower under annual cultivation. Since temperate zones stunt the growing season, homegrown ginger skin will not thicken to the extent of what you find in stores. That thick, mature skin is what makes ginger shelf-stable. While this means your rhizome harvest must be refrigerated, frozen or otherwise processed, it’s easier to use because peeling is unnecessary. Plus, the enlivening flavor of “baby ginger” is a delightful delicacy with more depth and nuance than the mature root.
For success with ginger, aim to mimic the tropical understory conditions where it naturally thrives. Ginger enjoys temperatures between 70-90 degrees, consistent water, high humidity, rich soil and morning sun with afternoon shade. While it can handle full sun in temperate zones, its leaves will yellow with prolonged sun exposure; two to five hours of direct sun is ideal. Ginger can grow in containers, greenhouses, in the garden (as an understory plant) or indoors.
Sourcing Ginger Rhizomes
Rather than growing from seed, ginger is propagated by rhizome cuttings (which are confusingly called “seed ginger”). Ginger root from the grocery store may be used. However, purchasing from a reputable seed company guarantees fresher, disease-free and — if you wish — certified organic seed ginger. If you do source from the grocery store, look for rhizomes that already have eyes (new growth) emerging. Avoid shriveled, soft or moldy rhizomes. Some nurseries (local and online) sell ginger plants that can be directly planted in spring.
Pre-Sprouting Ginger
Since tropical ginger matures over many months, it needs help from the gardener to produce well over a shorter growing season. Home gardeners can extend the season by pre-sprouting ginger indoors in late winter. If your rhizomes are still dormant, soak in water until pale, tender eyes appear. At this point, rhizomes may be planted in containers or pre-sprouted further to kickstart the season. Rhizomes can be cut into smaller 1 1/2-2 inch pieces and planted one by one. However, planting a palm-sized piece with several eyes will yield a quicker, fuller container planting.
Pre-sprout ginger by preparing a propagation tray (or a wide, shallow pot) with several inches of moist coconut coir or peat moss. Nestle rhizomes into the coir and cover with another 1-2 inches of moistened medium. Then, cover the flat with a humidity dome (if you have one), and place it on a heat mat. Soon, the eyes will become bright green shoots reaching toward the light. Move the flat under grow lights once shoots are visible throughout. Pot each rhizome individually and keep moist until it’s time to harden off and transplant.
Preparing Soil for Ginger
Ginger requires rich, loamy soil with excellent drainage. Since each plant needs a lot of sustenance to produce so many juicy, nutritious rhizomes, ginger requires generously fertile soil. If you’re growing ginger in the garden, make sure the soil is loosened and amended with plenty of compost and other organic matter, as well as a balanced, all-natural fertilizer. For container gardening, seek a crumbly, coffee-colored organic potting mix, or create a soilless mix with coconut coir and compost or worm castings.
Planting Ginger in the Ground
Wait until temperatures are in the 70s during the day and above 55 at night before you plant ginger outdoors. Plant pre-sprouted rhizomes 6-8 inches apart into a trench dug about 6 inches deep, with eyes facing upward. Cover the rhizomes with about 2 inches of soil and keep “hilling” soil over the stems as they grow and turn pink. While this hilling technique isn’t required, it does encourage more rhizomes (similar to growing potatoes).
If you have access to a hoop house or greenhouse, ginger excels in the humid heat of these enclosures. Plant ginger in the understory of a taller crop, where the delicate leaves can be shaded from the sun, which can be quite harsh in greenhouse-type spaces. Since most hobby greenhouses and hoop houses are not heated, start ginger indoors and transplant once temperatures are ideal inside the house.
North Carolina A&T has research ongoing exploring ginger performance across different microclimates. Even with the yellowing caused by sun exposure, ginger in Zone 7b may yield more rhizomes when planted in full sun than part shade. Depending on your zone and your gardening goals, try planting ginger in a few locations, from in-ground to containers with varying sun, and compare outcomes. Check your local cooperative extension website for research-driven guidance specific to your climate.
Companion Planting with Ginger
The book Japanese Style Companion Planting by Toshio Kijima highlights the usefulness of ginger as an understory crop in the biodiverse kitchen garden. Since ginger likes some protection from the sun, plant it in the understory of taller, broad-leaved plants like eggplant or taro. Ginger helps prevent soil-borne disease through its natural antibacterial properties, making it a useful companion. Configure plantings so that tall plants shade ginger during the afternoon. Explore other tropical companions like turmeric, chili peppers, hibiscus, lemongrass or canna lily. Ground-covering gotu kola could complete the planting scheme around ginger’s base.
Planting Ginger in Containers
Ginger performs well in containers — perfect for a patio paradise. To encourage vigorous root growth, large containers with ample air flow (like these grow bags) work well. Containers may yield larger harvests than in-ground plantings if regularly watered and fertilized.
Since rhizomes spread horizontally, choose a pot with plenty of width to accommodate growth (ideally, a width of at least 18 inches and a depth of at least 12 inches). Using a soilless medium like coconut coir encourages good drainage; mix with compost or worm castings for nutrition. If using regular potting soil, choose something rich, but with a fluffy texture. Growing in containers, you can easily move plants around until they look happiest, striking a balance between enough sun to feed rhizomes, and enough shade to protect leaves from yellowing. The further north you live, the more direct sun you will need.
Growing Ginger Indoors
Ginger can be sprouted and potted up anytime as a houseplant. While indoor growth will be less vigorous, it is still worthwhile. Indoors, ginger prefers bright, indirect light and regular watering. Use a rich and well-draining potting mix, and fertilize regularly to encourage rhizome development and leafy growth. Ginger may be grown outdoors through the growing season and moved indoors for winter; this way, you can wait for rhizome skin to thicken before harvesting mature, shelf-stable rhizomes.
Watering and Fertilizing Ginger
Ginger requires regular watering and fertilizing. Keep soil evenly moist; do not let it dry between waterings. Drainage is key — roots rot if they sit in heavy, saturated soils. Tending ginger in containers with a nearby hose makes the watering regimen easier to remember. Decrease watering in autumn as temperatures drop.
Fertilize plants monthly through the season to spur root growth. Along with pre-sprouting, fertilizing helps ginger spread eagerly enough for an autumn harvest. Incorporate an all-purpose organic fertilizer at planting time; then, feed monthly with a liquid fish and kelp emulsion (like this one from Neptune’s Harvest). Fruition Seeds offers a granular fertilizer formulated specifically for ginger.
Buy Growing Supplies
Weeding and Mulching Ginger
Since ginger is needy for nutrients, remove all weeds to eliminate competiton. Mulching with a 2 inch layer of leaf mold or straw suppresses weeds and keeps the soil moist, which is essential to success with ginger.
Harvesting, Storing and Drying Ginger
Once you see frost in the forecast in fall, it’s time to harvest ginger. Use a garden fork to gently pry the rhizomes out of the soil. Ginger rhizomes typically spread about 1 foot around the plant’s base; dig outside of that radius to avoid piercing them.
Rinse roots and let them dry on a towel or cooling rack before storing or processing. Ginger stores beautifully in the fridge (short-term) or freezer (long-term). Break the rhizomes into more manageable pieces before storing in a freezer bag or jar. Ginger may also be dehydrated and ground into a powder for years of enjoyment.
Cooking with Ginger
Keeping ginger in the freezer for quick and easy culinary use is a favorite kitchen hack for lovers of its zippy flavor. To use frozen ginger, simply grate it on a microplane — there’s no need to peel it. This fine grating yields ginger with a melty, snowflake-like consistency that blends perfectly into soups, stir fries, smoothies and salad dressings. Unfrozen ginger may be minced before adding to recipes. To sub fresh ginger for dried, mince it very finely and triple the amount of dried ginger called for in the recipe.
Ginger as Medicine
Widely known as a digestive aid, ginger is also a powerful supporter of the circulatory and reproductive systems, noted Tammi Hartung in her book, Homegrown Herbs. Ginger is an antioxidant and, per a study in International Journal of Preventive Medicine, may help reduce inflammation in the body. Its warming, soothing qualities make it an excellent remedy for nausea, headaches and abdominal cramps. Most commonly enjoyed as tea, ginger roots can also be used to make tinctures or infused in oil, vinegar or honey. For a delicious tea, try boiling chopped ginger root in water for about ten minutes. For more flavor, add a cinnamon stick, orange peel, sliced turmeric or fennel seeds as recommended by The Minimalist Baker. Ginger also harmonizes deliciously with lemongrass, hibiscus, mint, honey and lemon.
Ginger Recipes from Food Network
Try some of Food Network's best ginger recipes:


